Also see our Stovepipe Steamer Instructions
 Here's a quick and easy method for steaming a small quantity of silk (2 to 4 scarves or under 2 yards of fabric). Building your own steamer is somewhat time consuming but not difficult. The object is to subject the dyed fabric to a steam filled environment for a specific period of time without water drops landing on the fabric.
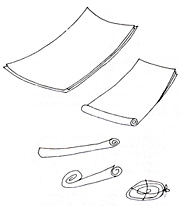
 On a work surface lay 2-3 layers of clean, unprinted newsprint. Next, lay your dry, dyed silk (design side up) on the paper with 2" allowance all around. If placing scarves side by side be sure they don't touch each other (at lease 2" apart).
Then place 2-3 more sheets of paper on top of that. Start rolling into a tube. Be sure to smooth out any wrinkles as you roll (this is very important, or you may unwittingly be steaming wrinkles permanently into your silk!). You can try using a small diameter pole (broom handle) to facilitate rolling into a neat, tight roll. When completely rolled, tape everywhere you think it could come unrolled. Remove pole. Flaten the roll a bit, tuck in the opening nearest you and seal with tape, and then roll like a cinnamon roll, into a coil.
Tuck in the other end and seal with tape and then secure the coil with tape or tie gently with string. The final flat roll must be small enough to fit into the pot, on top of the stand you will make below.- In a large pot (a canning pot is ideal), put about 2 inches of water or whatever mixture the instructions for the dye you have used call for.
- To keep the fabric out of the water make a stand using a tin can with both ends removed and an aluminum pie pan or wire rack on top. On top of the pie pan place a dish towel or several layers of newsprint cut into circles to fit. This is to absorb moisture and avoid a puddle. The aim with all of this is to set up a situation where your wrapped silk can be steamed but at no time get wet!
- After placing on the stand, cover the wrapped coil with 4-5 more layers of newsprint circles. Place a piece of aluminum foil over the coil and lightly crimp it around the edges of the pie pan. The foil will protect your piece from any condensation that may collect on the inside of the lid.
- To pad the inside of the lid, cut a stack (3/8-1/2") of lid-size circles from newspaper. Place the paper on a thick cotton towel and the lid on top of that. Gather up the sides of the towel and fasten securely over the top of the lid with clothes pin or safety pins. Place the towel-covered lid on the pot making sure that no part of the towel is hanging down in danger of being near the flame or heat from the burner. Weight the top of the lid with something heavy to build pressure inside. (Careful this is not intended to be a bomb. The steam needs to escape or it will explode. A brick or two or an upside-down heavy pot will do just fine). Stay near the pot during the steaming process so you can ensure that all is safe!
- Begin heating the water to a boil, then turn heat down to an even, constant simmer. The amount of time needed to steam-fix the dyes varies depending on the type and amount of dye used, the weight of the fabric, and the amount of yardage. This can be anywhere from 20 minutes to 3 hours. Follow the dye manufacturer's suggestions. Try to have enough water so that you don't need to add any along the way, but if it is necessary, do so with boiling water so you don't loose as much time and temperature.
- After steaming, remove and unwrap the roll carefully; it will be hot to the touch. Hang fabrics so that the fabrics don't touch each other, wait 24 hours, then wash in detergent. Blot with a clean towel, and iron dry with a cool iron.
Some notes:
- Wrinkles will set when steamed. (Actually that is how designer crinkle-silk is made.) So be careful to keep your silk smooth and flat while you roll it.
- Condensation in the steamer creates drips of water that can water spot your work if you you don't carefully protect it.
- Gutta may stick to the newsprint, but the bits of paper that stick to the clear gutta will be removed with the gutta during dry cleaning.


