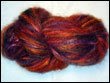
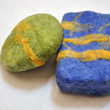
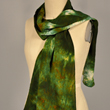
Acid Dyes are concentrated powdered dyes for dyeing protein fibers and some Nylons (best for PFP or "prepared for printing" Nylon). The best choice for tub dyeing silk and wool fabrics, skeins of silk or wool yarn, feathers, etc. You can also paint or print with it if you fix it by steaming. For tub dyeing, use these dyes on your stove or in a washing machine, keeping in mind that they do require very HOT water or steaming for best results.
The only other thing needed is a fixative. Oh, look! There is a two pound citric acid bag with this set! Acid Dyes react fast, exhaust well, and results for most colors are very lightfast and washfast. As with all powdered dyes or craft chemicals, handle with care and use good housekeeping procedures.
What's in the bag?
#DAD2 (2oz. jars)
- 401 - Brilliant Yellow
- 402 - Fire Engine Red (483 Chinese Red is a back up if 402 is out)
- 407 - Caribbean Blue
- 409 - Dark Navy*
- 411 - Deep Magenta
- 413 - True Black*
- 2 lb. Citric Acid
Click on the "Instructions" tab for complete instructions, very useful charts on the properties of the dye colors and a very helpful "trouble shooting" article. Keep in mind that an * by the name of a dye color (black and navy) indicates to use that color at 4% of weight of goods rather than 1.5 - 2% for the rest of the colors.
Made in: UNITED STATES (USA)
Dharma Acid Dye Instructions
General Information & Use for Dharma Acid Dyes
Applicable to any brand of Acid Dyes
Acid Dyes are the dye of choice for dyeing all protein fibers, like wool and other animal hair like alpaca, angora, mohair, etc., silk, feathers, and also they dye nylon. They are even used on leather sometimes. These concentrated powdered dyes are used primarily for tub-dyeing yardage or clothing, or tub dyeing or painting on protein yarns & roving. You can use these dyes either on top of your stove or in a washing machine but they do require very hot water to work properly. Washing machines don't get as hot, but do maintain consistent time, temperature and agitation, yielding more even results. If you are using them for direct application you would steam or microwave them. The only other thing needed (as a fixative) is household white vinegar or a mild powdered acid like Citric Acid which is actually more economical and eliminates the Vinegar smell. Textbooks and commercial dyers also talk about adding leveling agents to get the most even solid colors, like Glauber's Salt to Leveling Acid Dyes and using Ammonium Sulfate (used also for fertilizing plants) first, before the vinegar or citric, with Milling and Pre-metallized Acid Dyes, especially when
dyeing paler colors. Check out our article - "Did you Know how Acid Dyes Work" if you are a really serious wool/silk dyer and really want to get into the chemistry and types of Acid Dyes and how they work. We have identified all the pure colors on the chart at the bottom of the page as to what type they are, although information out there is conflicting. Basically, the ones marked with an M or a P need a little more work and possibly Ammonium Sulfate to get more even "level" dye jobs. For low immersion dyeing, where you want lots of color separation (sometimes called "breaking", our mixes marked P are great! Also keep in mind that Milling and Pre-metallized Acid Dyes, while more difficult to work with, are more wash-fast and often more light-fast than Leveling Acid Dyes. On the color chart, the colors marked "Advanced", or marked with a + on the blue chart below, are pre-metallized mixes, and they tend to "split" the most, even more so than pure pre-metallized colors.
Acid dyes are very economical, as they are very concentrated, react fast, and the results are very permanent for most colors (see chart below) - light and wash fast! The end color depends on your temperature, how much dye you use, how acid the dye-bath is, how long the fabric is in the dye, and how much fabric you have. Monitors and printed color charts can vary. Also, our color chart was done with a basic wool yarn. Silks sometimes come out lighter, sometimes even a different shade, so as with all dyes, it is important to test, test, test! If you have any problems after following the instructions, we have a "Dissolving and Trouble Shooting" segment we have written for you after much research. And as with all dye powders, you should handle them carefully. Common sense and good housekeeping (dust mask, gloves, proper ventilation, etc.) should always be used when handling any dye or chemicals. Keep out of reach of children and pets.
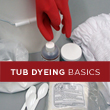
Stove Top Immersion Dyeing with Dharma Acid Dyes
- We recommend always to pre-wash your fabric in hot water and Dharma Dyer's Detergent to remove oils, dirt, silkworm gum, etc., even fingerprints, that will hinder an even dye job. Some wools require scouring. Yarns vary. But everything does need to be thoroughly wet before adding to dye-bath.
- Fill a stainless steel or enamel pot with enough hot or warm water for the fabric to swim freely, turn on the heat.
- Pre-dissolve the proper amount of dye powder for the weight of the fabric/yarn you are dyeing in about a cup of hot water (pyrex with a spout is great!), then add to the pot and stir. If a color seems hard to dissolve, try a little boiling water. To get most of the colors on our dye color chart, we used 1/4-1/3 oz per lb of fabric (1.5-2% of the weight of the fabric - %OWG), which is approximately 2 1/4 - 3 level teaspoons (depending on the color - densities vary, so this is not an accurate method). To get a really dark Navy or a good Black, we used 2/3 oz/lb fiber (4% of the weight of the fabric or approximately 6 level teaspoons). For lighter colors, use less, for even darker than our color chart, use more.
- Add the fabric that has been thoroughly wetted to the dye pot.
- Raise the temperature to 185 for silk or up to 200 degrees for wool, just below boiling. Stir frequently for a few minutes to evenly distribute the dye.
- Add 1/4 cup of vinegar per pound of fabric. Try not to pour directly onto the fabric. Or add 1 Tbs. of Citric Acid per lb of dry fabric if you don't like the smell of vinegar. If you do a lot of dyeing, Citric Acid is also more economical. Again, for the Milling and Pre-metallized colors, try using 1 Tbs./lb of fabric of Ammonium Sulfate, which makes the bath go acid much more gradually, especially when trying to get level, even colors. Dissolve before adding to the dye bath. Add leveling agents like Glauber's Salt to the Leveling colors at this time also if you are going to use them. Then gradually add citric acid or vinegar towards the end to exhaust the dye more fully.
- Maintain temperature and stir frequently for 1/2 hour up to an hour for really dark colors. Regular stirring is even more important with the Pre-metallized and Milling colors. If a color isn't exhausting well, try adding more vinegar or citric acid. Some say a bit of plain salt in the dye bath also helps it to exhaust better. If you still have a lot of color left, take a note that you could try using less dye next time on that particular color.
- Wash in Dharma Dyer's Detergent and warm water to get out the excess dye. Never wash fibers dyed with acid dyes in hot water as it can break the bonds, which are not as strong as say, fiber reactive dye on cellulose fibers. Inform folks who buy your acid dyed silks and wools to dry clean or use cold water.
Note: If you are dyeing wool, a gradual heating and gradual cooling of the dye--bath is important so as not to shock and felt the wool.
Immersion Dyeing in a Washing Machine with Dharma Acid Dyes
(Not for wool. Wool will felt in a washing machine and dyes better with even hotter temperatures than silk. Use the stove top method for wool.)
These directions are for top loading washing machines only.
- We recommend always to pre-wash your fabric in hot water and Dharma Dyer's Detergent to remove oils, dirt, silkworm gum, etc., even fingerprints, that will hinder an even dye job. At the very least, everything does need to be wet before adding to dye-bath.
- Set the washing machine to the hottest wash/cool rinse and longest wash cycle. Some folks say to turn your hot water heater to its highest setting first and let it heat up, especially when you are going for black and other dark colors, or they add some boiling water to increase the temperature. For silk, you are trying to get as high as 185 degrees F, although that is almost impossible with a washing machine. For dark colors it matters more than light colors. CAUTION - if you turn up your water heater, warn your family and don't forget to turn it back down after your dye-bath!!! Fill water to the lowest level appropriate for the amount of fabric being dyed, i.e., so it can swim freely but way more than that.
- Pre-dissolve the proper amount of dye powder for the weight of the fabric/yarn you are dyeing in about a cup of hot water (Pyrex with a spout is great!), then add to the pot and stir. If a color seems hard to dissolve, try a little boiling water. To get the colors on our dye color chart, we used 1/4-1/3 oz per lb of fabric (1.5-2% of the weight of the fabric), except to get a really dark Navy or a good black, use 1 oz/lb fiber (4% of the weight of the fabric). For lighter colors, use less, for even darker than our color chart, use more. A full washing machine load can hold approximately 8 lbs of fabric, depending on how dense it is or how big the machine is. For 8 lbs of fabric, 1.5-2% weight of goods = 2 - 2.5 oz of most colors ( ~6 - 8 TBS or 1/3 - 1/2 cup, again, depending on the density of the dye), 4% weight of goods = 5 oz of dye for Dark Navy and Blacks (~16 TBS or 1 cup).
- Add clean wet fabric and agitate for a few minutes.
- Add 1-2 cups of vinegar depending on the size of the load and how dark you want the color, being careful not to pour directly onto fabric. Or add 1 Tbs. of Citric Acid per lb of dry fabric if you don't like the smell of vinegar. If you do a lot of dyeing, Citric Acid is also more economical. Again, for the Milling and Pre-metallized colors (see chart below), try substituting 1 Tbs./lb of fabric of Ammonium Sulfate, which makes the bath go acid much more gradually, especially when trying to get level, even colors. Dissolve before adding to the dye bath. Add leveling agents like Glauber's Salt to the Leveling colors at this time also if you are going to use them. Let agitate 15 more minutes or so, depending on the depth of color you want. Then gradually add citric acid or vinegar towards the end to exhaust the dye more fully.
- Let machine run through cycle OR for maximum wash fastness, stop and reset washer until your fabric has been agitating at least 30 min. to an hour for darker colors. Do not let the washing machine drain or start a new wash cycle. You just want to lengthen the time the fabric is in the dye bath. After resetting, let washer run through entire cycle including a cool rinse.
- To ensure that all of the excess dye has been removed, we suggest running the fabric through another wash cycle with cool to warm water Dharma Dyer's Detergent. Again, never wash acid dyed fabrics or garments in hot water as it can break the bonds of the dye and it will just continue to bleed.
- Run washer through a large rinse cycle to remove any excess dye in the washing machine.
Silk Painting with Acid Dyes
For professional silk painters who steam set, liquid acid dyes provide the brightest, most intense colors. To make your own liquid acid dyes for silk painting, use the following recipe:- Stock Solution
-Add 8 oz. (1 cup) of very hot water to one 1/2 oz. (for Black and a Dark Navy, use 1 oz.) of Dharma Acid Dye powder. Stock solutions can be stored up to 6 months in the refrigerator. Reconstitute by heating.
-Stir until dissolved. This will yield a very concentrated dye stock solution. Most colors require further dilution. Note: Every color has a different solubility. Some colors are difficult to dissolve, but most are easily dissolved. A small amount of alcohol (about 1 tablespoon) can be added to the dye solution as a wetting agent, and boiling water can help dissolve also. - The final concentration of the dye solution for painting should be between 4 and 8%. Start by adding 4 oz. (1/2 cup) of water to the 8 ounces of stock solution you have, test the color and continue adding water until desired shade is achieved.
Keep in mind that the color intensity really develops in the steam setting process. Most colors will remain stable in solution for a long period of time. However, some colors will fall out of solution, and some might even congeal (especially some of the reds), upon cooling or from sitting for a matter of weeks. To restore them, simply heat them on the stove.
Also keep in mind that some mixes of Acid dye colors, especially milling and premetalized dyes, can "separate" as they are drying and the colors migrate. Can be desirable, as it adds texture. If you don't want this, use the colors that we mark on the chart below with a color index #, as those are pure, unmixed colors.
Screen Printing, Stamping & Painting with Acid Dyes
The traditional method of printing with dye is to add the dye to a thickener paste. This method can be used for screen printing, hand-painting, stenciling and stamping and many other direct application techniques. As with the methods above, it is important to prepare the fiber by washing to remove the sizing and anything else that might hinder the dye from penetrating.
- Wash, dry and iron the fabric.
- Prepare dye thickener paste (see below).
- Add dye, either powder or stock solution, as above, to thickener. Proportion the dye in the container in relation to the amount of thickener paste and desired intensity.
- Print, paint, or stencil or stamp on fabric.
- Air dry. Steam set. (See Steam setting directions.)
Preparing Dye Thickener
When screen printing with dye thickened with sodium alginate, the print base should be as thin as the image will allow. Dye printed in too thick a base will halo from the image before the fabric is cured or will accumulate in the corners, altering the image. Sodium Alginate SH is a high viscosity, low solids type of alginate thickener used primarily for cotton and other cellulose fibers. It may also be used for silk when fine line definition is not required. Sodium Alginate F is a low viscosity, high solids alginate used for silks and synthetics when fine line definition is desired. Use about 2 1/2 times more of the F to equal the viscosity of SH.
- Mix chemical water by adding 1/4 cup of urea and 1 Tablespoon of vinegar to 1 quart of water.
- Sprinkle sodium alginate over water and stir constantly for 10 minutes, OR mix in blender.
- Let stand for a few hours or overnight before using. Mixture may be stored in refrigerator for many months.
DHARMA COMMENTS:
Acid dyes will work on other things besides silk and wool. Basically anything protein, like feathers, fur, leather, etc. You just have to come up with a way to use it that won't ruin the substrate you are using it on - for example, leather doesn't like being simmered in a pot, it will just dry out. With feathers or leather, some folks paint it on, then steam it. These dyes also work on Nylon as it has a similar chemical structure. With Nylon, as with all fabrics, you must be sure there is no surface treatment that will interfere with the dye bonding with the fabric, i.e.: water repellents, stain resistance. So called PFP (prepared for printing) Nylon works best.
Dye Quantities
The quantities recommended are for the deepest color saturation in one pound of fabric. For pastels and lighter colors, use less dye. For darker colors, use more dye.
To get the colors on our color chart, we generally used between 1.5% & 2% OWG (of weight of goods), except for #413 True Black, #476 Toner Black and #409 Dark Navy. These colors have an * next to their names on our color charts and jar labels. For the blacks, we used 4%. For the Navy we got a nice Navy at 2%, and a dark "to dye for" Navy at 4%. 1.5% worked well for the light colors and 2% worked well for all the darker colors with the three exceptions above. That translates to 1/4 oz to 1/3 oz (or ~2.25-3 tsp) of dye per pound of fabric for most colors, and 2/3 oz (~6 tsp) of dye per pound of fabric for black and the deepest of Navies. You have to play with it as silk and wool uptake differently, so if the dye bath isn't exhausting all the way, even if you add more vinegar or citric acid, make yourself a note to use less dye next time for that color. These are very concentrated dyes, and that is one thing that makes them very economical. (Besides our great prices!)
Dharma Acid Dye Primaries
Any of the "pure" yellow, blue and red or fuchsia type colors can be used as primaries, but the chart below lists the most popular.
| - | Cyan | Magenta | Yellow |
|---|---|---|---|
| Warm Primaries | 404, 409, 415 | 402 | 414, 401 |
| Cool Primaries | 407 -for brightest, 416 | 411, 406 for super bright | 401, 445 for super bright |
Dharma Acid Dye Properties
Colors #406, 445 and #456 are pure Fluorescent and glow under black light. Our new colors #478 & #479 are Fluorescent Acid dyes mixed with another color (unfortunately, no such thing as a fluorescent blue), so they fluoresce, but not quite as strongly.
For wash & light fastness higher numbers are better. For the less wash fast dye colors, of which we are carrying a couple so you have more color choices, Dharma Dye Fixative or Retayne in a final soak after dyeing helps a lot. Wash less wash fast colors in cooler water. Acid dyed silk and wool should be washed in cooler water anyway. Hot water breaks the bonds that make the dye permanent, and will cause the dye to bleed. All the dyes can be dry-cleaned. There are 3 basic Acid Dye types : L=Leveling, M=Milling, P=Premetallized 1:2 (see our article - "Did you Know how Acid Dyes Work" if you are a serious wool/silk dyer and want to get into chemistry and types of Acid Dyes and how they work). Some folks suggest mixing L colors with L colors, and M or P colors with M or P colors, because of the sizes of the molecules and how fast they travel through the water or the fiber (see below), if you want completely even dyeing. Leveling agents, as discussed above, help to solve that. There is also conflicting info out there as to whether some colors are L or M as some sources listed them as both. For low immersion dyeing, where you want color separation, you can mix any of them indefinitely!
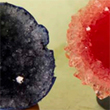
Colors below marked with an + are pre-metallized mixes that are having the most variation in color dependent on the conditions of the dyebath and other factors (see our trouble shooting guide). They tend to "break" the most, separating into their component colors, especially with low immersion techniques, which can be very visually interesting. We brought them in because they are beautiful and unique colors that are very difficult to achieve by mixing leveling or milling dyes, and have never been available to home dyers before. The Pre-metallized colors are also extremely washfast and lightfast. We think that once you get the hang of using them, they are worth it! If you want colors that are easier to use, we recommend you enjoy the other 49 beautiful colors. Just remember, if you want the color perfectly even or "level" when using any of the Pre-metallized colors or even the Milling colors, use ammonium sulfate at the beginning of the dyebath as described in detail above, and stir more than you would with the Leveling colors.
| Color # - name | Color Index # / Dye type | Solubility in hot water gm/liter | Wash Fastness Scale 1-5 | Light Fastness Scale 1-7 | Dischargeability w/ Discharge Paste |
|---|---|---|---|---|---|
| 401 - Brilliant Yellow | Acid Yellow 19 / L | 50 | 5 | 5 | doesn't |
| 402 - Fire Engine Red | Acid Red 419 / L | 25-30 | 4-5 | 6 | moderate |
| 403 - Flamingo Pink | mix / L | great | |||
| 404 - Sapphire Blue | Acid Blue 25 / L | 50-60 | 1-2 | 4-5 | doesn't |
| 405 - Deep Purple | mix / L | to pale blue | |||
| 406 - Fluorescent Fuchsia | Flu. Acid Red 52 / L - bright fluorescence under black light | 100-150 | 3-4 | 2-3 | doesn't |
| 407 - Caribbean Blue | Acid Blue 7 / L | 30-40 | 3-4 | 1-2 | moderate |
| 408 - Teal Green | Acid Green 25 / L or M | 10-30 | 4 | 6 | doesn't |
| 409 - Dark Navy* | Acid Blue 113 / M | 20-30 | 4-5 | 7 | to plum |
| 410 - Kelly Green | mix / L; slight fluorescence under black light | moderate | |||
| 411 - Deep Magenta | Acid Red 131 / M | n/a | 5 | 4-5 | good |
| 412 - Pink Orchid | mix / M | great | |||
| 413 - True Black* | Acid Black 194 / P | n/a | 4-5 | 7 | goesn't |
| 414 - Sunflower Yellow | Mix / L | n/a | 5 | 6-7 | moderate |
| 415 - Midnight Blue | Mix / L | n/a | 5 | 5 | great (to pale yel.) |
| 416 - Peacock Blue | Acid Blue 40 / L | n/a | 2-3 | 6 | doesn't |
| 417 - Tobacco Leaf | mix / L | moderate | |||
| 418 - Deep Maroon | mix / L | good, to tan | |||
| 419 - Cayenne Red | mix / L | doesn't | |||
| 420 - Golden Straw | mix / L | slight | |||
| 421 - Plum Dandy | mix / L | to bluer color | |||
| 422 - Bright Aqua | mix / L | 4 | 1-2 | good | |
| 423 - Blazing Orange | mix / L + M | moderate | |||
| 424 - True Turquoise | Direct Turquoise 86 / D | 35-45 | 4-5 | 7 | doesn't |
| 425 - Amethyst | Acid Violet 90 / P | n/a | 5 | 5-6 | doesn't |
| 426 - Pecan Brown | Acid Brown 282 / P | n/a | 5 | 6 | doesn't |
| 427 - Sand Dune | mix / P | doesn't | |||
| 428 - Chocolate Brown | mix / P | doesn't | |||
| 429 - Alpine Blue | Acid Blue 260 - 50% / M | n/a | 5 | 6-7 | doesn't |
| 430 - Persimmon | Acid Orange 144 - 50% / P | n/a | 5 | 5 | doesn't |
| 431 - Lilac+ | mix / P | doesn't | |||
| 432 - Antique Mauve+ | mix / P | doesn't | |||
| 433 - Strawberry Red+ | mix / P | doesn't | |||
| 434 - Pistachio+ | mix / P | doesn't | |||
| 435 - Soft Tan+ | mix / P | doesn't | |||
| 436 - Twilight Grey+ | mix / P | poor; goes purplish | |||
| 437 - Purple Haze+ | mix / P | doesn't | |||
| 438 - Olive Brown+ | mix / P | doesn't | |||
| 439 - Espresso Bean+ | mix / P | doesn't | |||
| 440 - Oxblood Red+ | mix / P | doesn't | |||
| 441 - Peach Blush+ | mix / P | doesn't | |||
| 442 - Honey Mustard | Acid Yellow 220 / P | 50-75 | 5 | 6-7 | doesn't |
| 443 - Tangelo | Acid Red 357 / P | n/a | 5 | 5-6 | doesn't |
| 444 - Electric Violet | Acid Violet 76 - 75% / L | n/a | 5 | 5-6 | doesn't |
|
445 - Fluorescent Lemon |
Flu Acid Yellow 250 - 25% / L - bright fluorescence under black light |
n/a | 5 | 2 | doesn't |
| 446 - Silver Grey | mix / P | doesn't | |||
| 447 - Emerald Green | mix / L | moderate | |||
| 448 - Chartreuse | mix / L | doesn't | |||
| 449 - Vanilla Cream | mix / P | doesn't | |||
| 450 - Sage Leaf+ | mix / P | doesn't | |||
| 451 - Moss Green | mix / L + M | to bluer green | |||
| 452 - Forest Green | mix / L + M | moderate | |||
| 453 - Fawn+ | mix / P | 5 | 6-7 | doesn't | |
| 454 - Poinsettia | Direct Red 81 | n/a | 3 | 4-5 | |
| 455 - Royal Purple | mix / L + M | 3 | 4-5 | ||
| 456 - Fluorescent Safety Orange | mix / L - bright fluorescence under black light | 2-3 | 3 | ||
| 457 - Extreme Blue | Acid Blue 62 / L | n/a | 2-3 | 4-5 | moderate |
| 458 - Cabernet | Acid Red 299 / M | n/a | 4-5 | 5-6 | good |
| 459 - Intense Iris | Acid Violet 43 / L | n/a | 1-2 | 5-6 | doesn't |
| 460 - Saffron Spice | Acid Orange 116 / M | n/a | 5 | 5 | moderate |
| 461 - Avocado | mix / L + M | 4 | 6 | ||
| 462 - Teddy Bear Brown | Acid Brown 19 / P | n/a | 5 | 7 |
doesn't |
| 463 - Duckling | mix / L | 3-4 | 5-6 | ||
| 464 - Hyacinth | mix / L | 3-4 | 3-4 | ||
| 465 - Lichen | mix / L + P | 3-4 | 4-5 | ||
| 466 - Baby Blue Eyes | mix / L | 4-5 | 4-5 | ||
| 467 - Mahogany | mix / L | 4 | 4 | ||
| 468 - Winter Green | mix / L | 4 | 4 | ||
| 469 - Golden Poppy | mix / M | 4 | 4 | ||
| 470 - Berry Crush | mix / L | 3 | 3 | ||
| 471 - Sour Apple | mix / L | 4 | 4 | ||
| 472 - Blued Steel | mix / L + P | 5 | 6 | ||
| 473 - Spearmint Breeze | mix / L ; slight fluorescence under black light | 4 | 1-2 | good | |
| 474 - Valentine Blush | mix / M | 4 | 5 | ||
| 475 - Aubergine | mix / M | 4 | 5 | ||
| 476 - Toner Black* | mix / M | 4 | 5 | ||
| 477 - Cherry Bomb | mix / M | 4 | 5 | ||
| 478 - Purple Pop (fluor.) | mix / L - medium fluorescence under black light | 2-3 | 3 | ||
| 479 - Radioactive (fluor.) | mix / L - medium fluorescence under black light | 2-3 | 3 | ||
| 480 - Sea Spray | mix / M | 4 | 4 | ||
| 481 - Ballerina Pink | mix / M | 4 | 4 | ||
| 482 - Delphinium Blue | mix / M | 4 | 4 | ||
| 483 - Chinese Red | Acid Red 88 / M | 3-4 | 3-4 | ||
| 484 - Platinum | mix / M | 2-4 | 3-5 | moderate | |
| 485 - Frozen Blue | mix / M | ||||
| 486 - Champagne | mix / M | 3-4 | 4-5 | ||
| 487 - Indigo Blue | mix / M | 4-5 | 4-5 | moderate | |
| 488 - Ivory | mix / M | 3-4 | 4-5 | moderate | |
| 489 - Monarch Orange | Acid Yellow 199 / M | 4-5 | 6-7 |
moderate |
Acid Dyes - Helpful Hints and Trouble Shooting
When mixing powdered Acid Dyes Dharma recommends the following dye dissolving procedure:
Always, always add liquid to powder, not powder to liquid.
Start with a cup of very hot (at least 180 degrees Fahrenheit) water and add about 1 tablespoon of that water to the powder. Smash the powder with a sturdy spoon while adding the liquid very gradually. This is called "pasting" the dye. We recommend this method for all colors. When it is a well-dissolved slurry, add the rest of the cup of water and stir vigorously. For hard to dissolve colors, try using hot Urea water (1-2 TBSP Urea/cup water) instead of plain water, or water at boil temp (212 degrees Fahrenheit) to paste up the dye. Also, let it sit for awhile, like half an hour, before you use it. With hard to dissolve colors that might be in a mix, this step can actually effect the final color you get.
To prevent freckling, strain your 1 cup solution into the dye bath water through something like thin pieces of silk (5 or 8mm Habotai works well) or fine nylon stockings placed in a funnel or strainer. If anything is left in the strainer paste it up with some more hot water and strain it again. Some colors in mixes dissolve much more slowly than the other color(s) and this solves that problem too. Experienced dyers will tell you it is worth this little bit of time to ensure a freckle free dye job! Also, because the raw colors, before U.S. manufacturers and distributors get hold of them and standardize them and make mixes with them, come from India and China usually, impurities like grains of sand or plastic particles are more common than they used to be years ago. Dharma makes sure all dye is sifted before packaging for this reason, but sifting doesn't catch everything. Straining the dye stock before using it is the next step. A great precautionary practice.
Urea is also especially helpful when making concentrated dye for painting or other direct application. One of its functions, besides being a humectant, is to allow more solids to go into solution in less liquid. Very handy in the dye world.
If you are using salt to help exhaust darker colors, add the pre-dissolved dye to the hot bath and mix well BEFORE adding salt. Salt reduces solubility, so if you do happen to have tiny particles of undissolved dye, they stand a better chance of going into solution without salt.
If you are making stock solutions with your dyes remember to re-heat them before you use them. It is normal for some acid dye colors, especially Acid Red 266, to fall out of solution when the water cools, or even to thicken and gel when very concentrated. Heating will restore them. Only mix as much concentrate as you can use in about a months time, after that the dyes will get weaker and give less vivid results.
Trouble shooting common problems/mistakes of newer Acid Dyers:
Freckling - see the above instruction on dissolving the dye, and straining for the more stubborn colors. Freckles, or small spots of color, are caused by clumps of undissolved dye striking in a small area on the fiber.
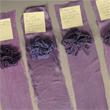
Splotchy or uneven Color , mixes separating - There are a few things that can cause splotchy results when dying solid colors. Even color is called Level. The term 'leveling' refers to the uniformity of the color. (Keep in mind that when you want deliberate color separation, mottling, etc., do the opposite of what is recommended to get level coloring!)
- Forgetting to Pre-wet the fabric - always soak your fabric in some cool to warm water with a couple drops of Kieralon before adding it to the dye bath. This will help the dye move through the fabric more evenly and help prevent areas from absorbing more dye then others. It will also help remove any fabric softener left on the material, which could inhibit dyeing.
- Not pre-washing - things like the above mentioned fabric softener, and even just oil from hands handling the silk or wool can cause splotchy dyeing, as well as silkworm gum, lanolin, machine oil, you name it. For level dyeing, fibers and fabric must be completely clean. Kieralon or Dharma Professional Textile Detergent and hot water work well for this.
- Over-crowding the goods - This is the most common factor in uneven dyeing. When fabric is bunched up, the dye pools in the folds and creates dark patches. Using a larger pot and more water will help reduce this problem. Bunching and dye pooling into the folds also happens when you don't stir enough.
- Heating the bath too fast - It is best to slowly raise the temperature of the dye bath once the dye and fabric have been added to slow the striking of the dye and give the dye molecules time to move through the fabric. Once the water is up to temperature THEN add the acid. Remember is takes heat and acid to make the dye fix, so the more gradually you increase them the more even your results will be.
- Uneven heat - It is important to frequently (but gently!) stir and flip your fabric/yarn/garment so that one section does not spend more time at the bottom of the pot than the rest. The bottom section of the pot is the hottest and dye will strike faster in the hotter areas of the pot.
- Adding the Vinegar (or citric acid) too early - Acid Dyes need heat and an acidic environment to strike and fix to the fabric. If you add the vinegar to the pot right before you add the fabric, the first end of the fabric ends up darker then the rest because as soon as the fabric hits the water dye starts to fix to it. Add your dye, stir it for a minute or two then add your fabric. Stir your fabric around in the dye for 5-10 min (longer for really large items) and let the dye evenly penetrate the material while you are getting the dye bath up to temperature. When you add the vinegar, push the material aside and add parts of it to different sides of the pot, or even pull the fabric out while adding the acid. Then stir the whole thing very thoroughly to make sure it is evenly mixed in as the dye often "strikes" very fast once the acid is added, and the less the fabric is moving, the more unevenly the dye will strike. This is especially important when using the pre-metallized dyes.
- The type of Acid Dye used to mix the color (or the type of Acid Dye in the purchased mix) - Milling and Premetallized dyes are very wash fast but sometimes they need a bit of help from a leveling agent. Commercial dyers use leveling agents to get the most even solid colors, such as adding Glauber's Salt to Leveling Acid Dyes (L) and using Ammonium Sulfate (used also for fertilizing plants and easy to find at gardening stores) instead of vinegar or citric acid with Milling (M) and Premetallized Acid Dyes (P). This allows the dye to attach itself to the fabric for a much longer time before the dye bath turns acidic and the dye "strikes". This is because Ammonium Sulfate stays a fairly neutral PH until the dye bath reaches about 150º F. This can also be duplicated by the suggestion above of adding acid to the dye bath much later in the process. Check out our article - "Did you Know how Acid Dyes Work" if you are a really serious wool/silk dyer and really want to get into the chemistry and types of Acid Dyes and how they work.
- Mixes of Acid Dyes with widely different chemistry or molecular weight, like mixing a Leveling Acid Dye with a Pre-metallized Acid Dye - the smaller molecules travel through the material faster than the big ones, which can cause colors to "separate" or "break". This separation is more common when using low immersion or direct application techniques, where it can be used to great advantage, but can be sometimes be seen in a dye bath situation as well.
- Low immersion techniques where steaming or microwaving is used to set the dye - in these situations where you don't have much water, the dye is trapped in the creases and folds. The fabric stays in one spot instead of swimming freely and moving when stirred in the bath situation. Different sized dye molecules, depending on the colors in the mix, migrate slowly through the fabric at different rates. It is perfectly normal to get color separation and blotchy results using these techniques. Artists use this to their advantage. Low immersion techniques are normally used to deliberately get color separation, as with tie-dye "bleed" that you see with fiber reactive dye on cotton. It is part of the beauty of low immersion dyeing or tie-dye techniques.
An unexpected color is coming up from a mixed color - usually seen at the beginning of a dye bath, but sometimes the end result too. More common with techniques that don't utilize the entire length and sequence of events as a "normal" dye bath, like baggie dyeing, microwaving, painting, steaming, etc. Also a great way to discover wonderful new effects of different mix combinations.
- Often when you have a mix of 2 or more colors, the pure colors in the mix are of a different molecular weight, size or composition, and some colors "strike" faster than others, even if the mix is of the same type of acid dyes. If you have a leveling dye (small molecules) mixed with a pre-metallized dye (much larger molecules), the leveling dye will strike much faster than the pre-metallized. The color you were expecting might not come up until very late in the dye bath. With mixes like this, it is very important to add your acid late in the process or use Ammonium Sulfate instead of Vinegar or Citric Acid.
- As mentioned above, a mix might have a hard to dissolve color in it, which dissolves later than other colors in the mix. Letting a color like this sit for ~30 minutes after you paste it up, then adding some more hot water before you use it, can help. We have found some of the blues are harder to dissolve, so the greens can come up yellower, and purples can strike more reddish than they should. Allowing more time for the blue to dissolve seems to solve this problem.
- Your end color is also affected by many other variables - water, fiber content, physical attributes of the fiber, etc. If you dye two different fiber types in the same dye bath, one may grab a color in the mix much faster than the other, hogging it, so the other fiber can come out a different color entirely. More absorbent fibers can come out a different color than less absorbent fibers, silk different than wool, etc. Put silk and wool in together, and the wool will absorb the dye much faster than the silk, and in different proportions of the mix components. Throw 5 different brands or types of wool yarn in the same dye bath of a mixed color and see what happens. Hard water can also yield different color than soft water. Technique alone can determine color; colors may come out differently depending on whether you do a full dyebath, microwave in a baggie, paint and steam, etc.
- If you have taken all these things into consideration, you can see if a color is possibly "off" by doing a "controlled" test, where you follow the dye bath directions to the letter with proper timing and proportions using a piece of common wool or silk and distilled water, or use water softener if you have "hard" water. You have to do it from start to finish, including the pre-washing and wetting, and through the washout and drying. That is the only way to ever tell if the problem is the dye, or one or more of the numerous other variables that effect final color.
The Dyes are not Exhausting - Sometimes the dye is not completely taken up by the fabric as is normal for Acid Dyes
- Too much dye - Double check your formula. We used 1.5% - 2% weight of goods (OWG) to get most of our colors of Dharma Acid Dye, except Black and Deep Navy (4%). Jacquard Acid Dyes have a chart in their instructions with specific amounts recommended for specific colors, ranging from 1.5% OWG all the way up to ~18% for the darkest colors. Remember - these % ratios are a starting point; you may need to increase or decrease the amount of dye depending on what you are dyeing and the environments, that you're working. At a certain point all the dye receptor sites on the fibers will be saturated. If you are happy with the color of the fiber pull it out and set it aside to rinse. Instead of tossing all the dye down the drain, stick some scrap fabric or yarn in and let it take up the rest of the dye. This is a great way to get new shades that may inspire a whole new project! Waste not want not. Also, some colors don't exhaust as well as others, but that does not mean you are not getting fixation.
- The color is not dark enough yet and the dye just doesn't seem to be striking or the dye bath is not exhausting - make sure you added your vinegar, even the best of us gets distracted by kids, pets, TV or a good sunny day. If you did add your vinegar but the water is still too dark and the fabric too light add some plain salt. One half to 1 full cup to start with; use more for dark colors like black and navy. Also, you can add more acid to cause more dye to strike.
- The water is almost clear but not quite - turn the heat off and let everything cool down. As the water cools its solubility decreases and this is often enough to encourage the last bit of dye to head into the fiber and fix. It is also good safety to let things cool before you pull out your item for rinsing.