


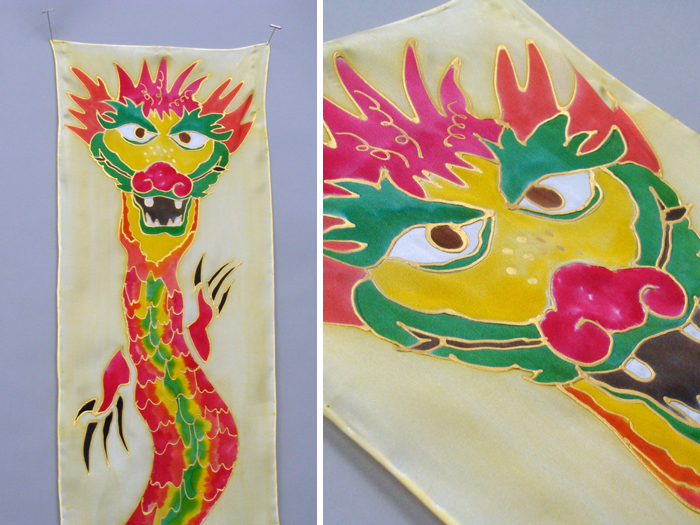
The Serti (closing or fence) technique is the silk painting technique where designs are outlined with gutta or water-based resists, which are applied to white silk that has been pre-washed, dried and stretched (on a stretcher). Once the gutta or water-based resist has dried, it acts as a barrier for the dye or paint; keeping the color within the outlined areas of the design and allowing you to achieve sharply defined borders. After the dye or paint has been properly set, the clear gutta or resist is removed and a defining line the color of the original fabric remains. Colored guttas and resists are also available that are meant to remain in the fabric.
Shopping list:
Gutta Applicator Bottle for the resist
A Stretcher Frame or a home made frame and hooks or pins
A white silk item to paint on
How it's Done:
Prewash Your Silk
Pre-wash your silk by hand or in the washing machine on a gentle cycle with warm water and Dharma Dyer's Detergent. Rinse, dry and, when still slightly damp, press with an iron set to the silk setting.
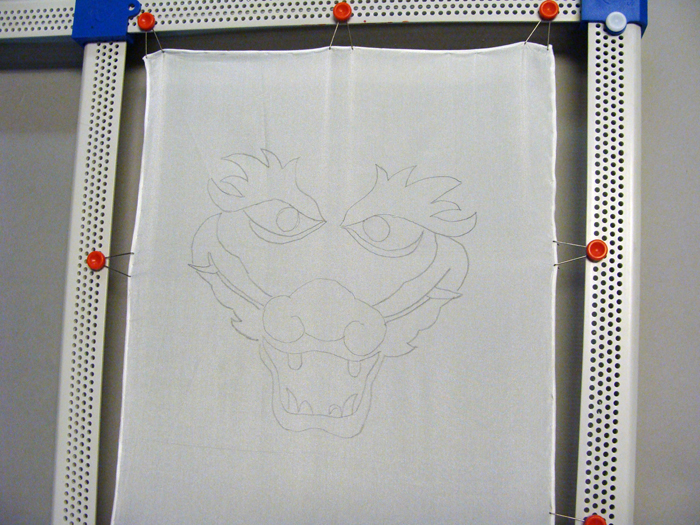
Prepare Your Design
The Serti Technique lends itself well to designs with enclosed areas where the color will be contained within the resist lines.

Draw your design to scale on a piece of paper, first in pencil and then go over it with a black marker, this will be your template. Lay your silk on top of the template and with a pencil or vanishing marker, lightly draw your design onto the silk. With thick silks you may have to draw free hand but having your template will still help.
Making a Stretching Frame
You will need a frame to stretch your silk and suspend it off the table.
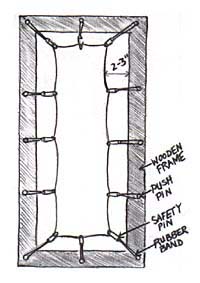
There are a variety of types of frames you can use, depending on the size of the piece you are painting, your budget and what is available. Artist's canvas stretcher bars work very well and are sold at most art supply stores. Your frame needs to be soft enough to allow push pins or 3-pronged tacks to be pushed into it OR you can create a 'trampoline' effect with rubber bands and hooks or silk clips (see below). The last method is best if you are painting a piece that has pre-finished edges, make sure that the inside measurements of the frame, are at least 2-3 inches larger than the silk to avoid leaving bleed marks on the hem.
In a pinch, you could also cut out a frame from a cardboard box.
Stretch your silk onto your frame with pins, silk thumb tacks or hooks spaced every 4-6 inches along each side. If need be, you can link rubber bands together for extended lengths. Rubber bands are great because they will maintain the tension of the silk for you.
The goal when stretching your silk is to create just enough tension so that the silk remains taut while you are painting but not so tight that it tears. Your piece may sag a bit once it becomes wet with dye or paint so you may need to adjust the pinning as you are painting. Placing upside down plastic cups or wood blocks underneath each corner of your frame will raise your frame a few inches above your table so that the silk does not have anything touching it.
Apply the Gutta or Resist
(see discussion of Guttas vs. Water-soluble Resists to decide which to use)
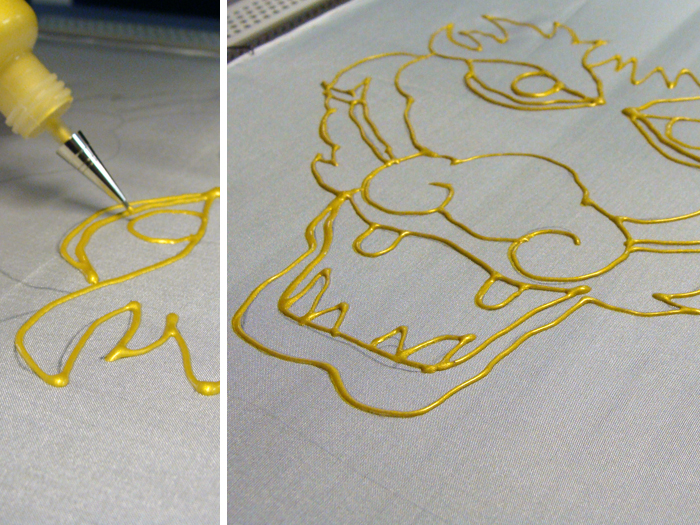
Fill your applicator bottle with resist and make sure the tip is on properly. Hold the applicator bottle vertically with the tip touching the silk. Using even pressure and a steady hand, draw your resist lines. Be sure there are no breaks or gaps in the lines, or dye will escape. Also check the back side of your piece to make sure the resist has penetrated all the way through. If it hasn't, dye can bleed under your resist lines so you will need to apply resist to the back side as well (this is more often necessary when working on silks heavier than 12 mm). Let the resist dry before painting (you can speed up the drying time with a blow dryer or heat gun).
Apply Your Dyes or Paints
(see discussion of dyes vs. paints to decide which to use)
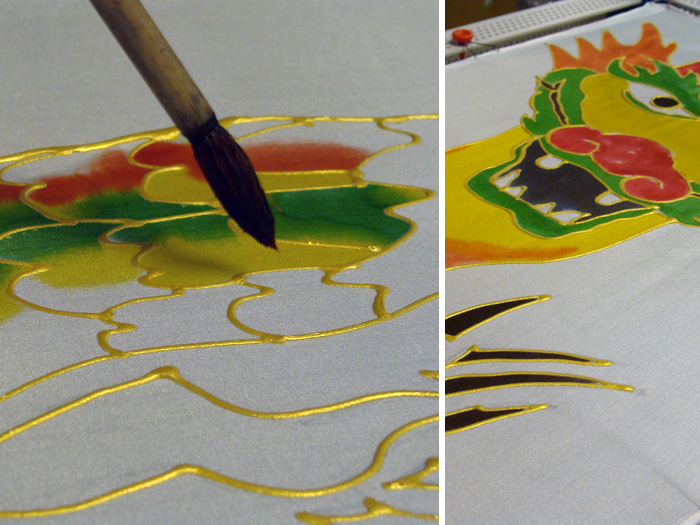
Dip your brush into the color and apply the dye or paint sparingly to the center of an outlined area by touching the brush to the silk. Let the paint move to the resist line - do not apply the paint too close to the resist as water-based resist may begin to dissolve if the line becomes too saturated. If there is a gap in your resist line that you didn't notice and the dye or paint starts escaping, you can stop the movement by drying it quickly with a hair dryer and then patch up the line with gutta or resist and let dry before resuming. When painting large areas such as backgrounds, work quickly, applying wet to wet to avoid unwanted lines.
Set the Color
When you have finished applying dye or paint to silk yardage or a scarf, note that it is not permanent until you "set" or "fix" the color. In other words, the color will all wash out if it is not "fixed". The method of "setting" or "fixing" the color depends on the chemistry of the dye or paint you are using. Before purchasing any dye or paint, you should read the directions thoroughly to determine if the required procedure fits your project and situation.
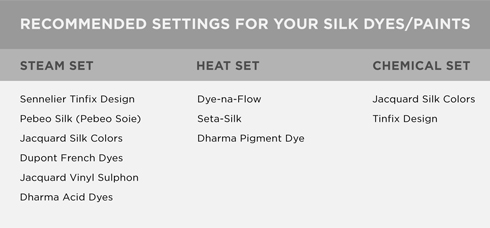
Setting Dyes With Steam (Jacquard Silk Colors (Green and Red label), Dupont French Dyes and Acid Dyes)
Of the two methods for setting silk dyes, the steaming method produces the most brilliant colors. Some people don't want to go this route, but those who do are usually very happy with the results. Read detailed steaming instructions.
Setting Paints With Heat (Dye-na-Flow, Seta-Silk)
Allow to dry 24 hours before heat-setting the paints with an iron. Iron each area of your piece for 2-3 minutes, face down on your ironing board with a press cloth between the silk and iron. You may want a protective cloth on the ironing board as well. Work in small areas at a time, moving in a small circular motion so as not to burn the silk, but also so that each section retains the heat for a long enough duration to actually set the paint.
Setting Dyes With Chemical Fixative Jacquard Dyeset for Jacquard Silk Colors
Jacquard also offers a liquid fixative for those who can't or don't want to steam set. It can be sprayed (lightly) over the dyes, or the project can be submerged in the fixative after ironing with a hot dry iron. Although easier, the colors will not be as brilliant and may not be as colorfast as they would if steam-set.
Removing clear gutta or clear water-based resist (not used in this example)
Once the dye or paint has been properly fixed, it's time to remove the gutta or resist. Clear gutta is removed by dry cleaning.
Clear water-based resist is removed by rinsing in warm water. It comes out easily when used with iron-set paints, but some brands can be very difficult, if not impossible, to remove after steam-setting dyes. Once the resist is removed, hang dry, then iron lightly while still slightly damp. See our "Gutta vs. Resist" page for more details.
If colored guttas have been used, do not dry clean (the color will come out with the gutta)! They are meant to stay in the silk, and there will be some "hand" or "feel" to the lines in the silk. Some people prefer to use the colored guttas on wall hanging pieces only, rather than on wearable art.
If colored water-based resists have been used, follow the manufacturer's instructions for heat-setting with an iron before painting on the color. See our "Gutta vs. Resist" page for details. The colored resists are meant to stay in the fabric, and there will be a "feel" to resist lines.
Other Basic Silk Painting Techniques:
Detailed patterns without resists can be achieved by priming the prewashed and stretched silk with a stop-flow primer which is left to dry before painting on the dyes or paints. Stop-flow, or No-flow primers cause the color to stay put rather than migrating. This allows for freehand painting without gutta or water-soluble resists. Think of stop-flow primers as starch-like sizing to prepare the canvas with. They wash out in the end.
Watercolor Effects can be achieved by applying dye or paint to silk that has been pre-washed and put on stretcher bars whether or not you are using resists (but not if you are using stop-flow). Dyes or paints are applied to the silk with a paint brush, mist sprayer, eye dropper or other tools to achieve abstract effects. Spraying the silk lightly with water before adding color increases the flow of the dye or paint. Sprinkling silk salt on the piece when still wet and leaving until completely dry before brushing off the salt, produces interesting textural effects. Applying alcohol to dye-painted silk can also create beautiful effects.


